Recently I had an issue - customer for our company iOS app sent a crash report. Due to my computer being almost out of hdd space, I constantly delete cached data and also derived data/created archives.
So, as usual, I download the crash report, open up Xcode->Window->Devices->Select-my-device->View Device logs, and I wait until all logs are loaded, and then I drag'n'drop the new crash report. It appears, and when I click on that entry, I now wait for it to get symbolicated - you know, so that I could pinpoint the crash. Nothing happens. Turns out - it cannot symbolicate, because it is lacking that ipa file in archives.
So, what to do?
Well, it turns out that you need to use .dSYM files to Symbolicate a crash report. And this article is about how I got my crash report symbolicated.
In the crash report, I find lines that should show the location in code:
3 appName 0x00140fd5 0x8e000 + 733141
4 appName 0x0014253b 0x8e000 + 738619
Then I fill in parameters from those lines in this (executed in terminal) (I got the 8 from the 0x8 )
grep --after-context=8 "Binary Images:" /Users/gtreulands/Downloads/appNameCrash_1478467392.crash | grep appName
And it returns me:
0x8e000 - 0x7a9fff +appName armv7 <88b714e5d8b731d79b9b988db94a474c> /var/containers/Bundle/Application/AE8F1973-6D91-4A64-B9F6-F0611C30C822/appName.app/appName
Now I got UUID which I can use to find the needed .dSYM file (turns out, they are stored elsewhere in your computer, even if you delete achieved ipa files).
This UUID needs to be rewritten as 8-4-4-4-12 and all caps lock: 88b714e5d8b731d79b9b988db94a474c = > 88B714E5-D8B7-31D7-9B9B-988DB94A474C
Then I execute this command in terminal:
mdfind "com_apple_xcode_dsym_uuids == 88B714E5-D8B7-31D7-9B9B-988DB94A474C"
And if he finds, he throws out in terminal the address to the file. In my case:
/Users/gtreulands/Library/Developer/Xcode/Archives/2016-09-09/appName 09-09-16 18.28.xcarchive
So, now I go to that folder, and in that (.xcarchive is also a folder..) I find the needed .dSYM file (which is also a folder).
And now the last step - using this .dSYM file, I can find in that file code function and line number, by providing address that I got earlier from crash report:
atos -arch armv7 -o /Users/gtreulands/Desktop/appName.app.dSYM/Contents/Resources/DWARF/appName -l 0x8e000 0x00140fd5
And it throws out:
-[LEditItemListView updateDataCell:atIndexPath: ] (in appName) (LEditItemListView.m:320)
These are great documentary articles where I got the necessary information:
https://developer.apple.com/library/content/technotes/tn2151/_index.html
https://developer.apple.com/library/content/technotes/tn2151/_index.html#//apple_ref/doc/uid/DTS40008184-CH1-SYMBOLICATE_WITH_ATOS
Thursday, November 10, 2016

Saturday, February 27, 2016
Xcode coloured logs | Swift
For Obj-C I used to love this one: https://github.com/robbiehanson/XcodeColors It gave me superman-like capabilities, and I could have various type of console log outputs, which I could turn on/off, and with any colour I desired. Fantastic!
But then I started playing around with Swift. But the same library is not done in the same quality for Swift. Yes - I get coloured logs, but one of XcodeColors features I loved was that it also logged out pretty timestamp and function from which it was called. I could simply write
DLog();
And it would output in console something like:

And it was great! but for swift it produces:

So, I was not in search of something similar to Obj-C alternative.
Of course if you simply replace print with NSLog, then it at once becomes more usable:

But still, no function origin.
So I searched the web, StackOverflow until I could gather together a simple class, which gives me just those capabilities: https://github.com/GuntisTreulands/ColorLogger-Swift

So now I can get pretty timestamp, original function name, and coloured output. And usage is as similar to Obj-C alternative as possible!
But then I started playing around with Swift. But the same library is not done in the same quality for Swift. Yes - I get coloured logs, but one of XcodeColors features I loved was that it also logged out pretty timestamp and function from which it was called. I could simply write
DLog();
And it would output in console something like:

And it was great! but for swift it produces:

So, I was not in search of something similar to Obj-C alternative.
Of course if you simply replace print with NSLog, then it at once becomes more usable:

But still, no function origin.
So I searched the web, StackOverflow until I could gather together a simple class, which gives me just those capabilities: https://github.com/GuntisTreulands/ColorLogger-Swift
So now I can get pretty timestamp, original function name, and coloured output. And usage is as similar to Obj-C alternative as possible!
Log()
Log(window)
LogRed("Blue test")
LogBlue("Red fountain")
LogOrange("Yellow submarine")
LogBlue("text count \(5) and object \(window)")
LogOrange(("text", "bext", 5, temp))
Replace alpha in image with white colour | Mac
Bunch of images with alpha colour. Task is to post those images (one at a time, every few days) to Facebook, Twitter. Problem is - once uploaded - alpha is removed and it shows black background instead.

Ugly!
So, I found this cool little app, that removes Alpha channel from images. (Drag and drop) But it then again is black. I tweaked code a little bit and uploaded it to GitHub - maybe it will be handy to someone also. It sure was helpful for me... (100 images in few seconds, and I can move on with my life on some more interesting tasks :) )
Lightweight Core Data Migration | Obj-C
So.. you have an app, that uses Core Data database, and data that is being accumulated in app is offline only. Everything is great but now you need to develop next version, but it requires to adjust database structure (new entities or maybe add new attributes?).
This happened to me, and I tried to put this problem as far as I could but I finally had to deal with it. So, what are the problems?
Basically - if user will install the update, launch the app and it detects that Core Data model has changed - it will not be able to load it, and one of possible safe measures would be simply to delete existing Core Data model/data, create new and continue from that point with a fresh page. But - then you loose your old data, which could be cumbersome for users. (If you can simply download data from internet again - whew, no problem then!)
So, what do you need to do, in order to add support for data Core Data migration from previous version to new one?
It all depends on the changes. In my case, we introduced new feature - new module in app. Thus we needed to add new entity in Core Data model. So - old data will not be touched.
It turns out - for iOS 9 you simply need to add options when setting up NSPersistentStoreCoordinator persistent store.
Of course, it is preferred that after all this, you download AppStore version, set it up, fill some data, and then compile over it your new version, and see if all goes smoothly.
------------------------
Ok, but it turns out for iOS 8 this was only part of solution. iOS 8 could not automatically adjust previous model and it always ended up with error and so app had to remove previous database file, and start from scratch.
So, it turns out - you need to help out iOS - by adding versions in Core Data models.

In your xcode project select dbModel.xcdatamodeld and in the top status bar menu - choose "Add Model Version...".

And add a new name, so you can easily know which model version is which. I tend to add version next to the name. Select model version you are continuing from. (Should always be the oldest version).

At this point you have a new model version! This version should be activated - that can be done on the right side of xcode: (Model Version - Current:)

Your original model version should be in a state as it was for the first version, and all the changes should be done only for the new version, otherwise it will not work! Unfortunately I did not know this, and I ended up overwriting original version and only then realise the problem. I could not revert back the changes done to the model (xcode project was closed and opened), And no matter how much I tried to adjust old model - it still had some differences from the original model. So there was only one possibility how to get the original model - from the App Store .ipa file. Here is more info how to do it: (http://stackoverflow.com/a/28054459/894671) So now that you have original model, and new model - iOS (at least iOS 8 and iOS 9) will successfully migrate previously existing model to the new one.
------------------------
A whole different story is in case you need to adjust existing Core Data database data because of the new model. In that case you need to write up some functionality that will detect application version and will go through all necessary data and .. do the thing you need to do to adjust it (But only one time). (For example, add a new relationship, or add a new attribute with calculated value...)
This is up to you to find/figure out the best/easiest way to deal with it. In my case - on one of the versions I had to do something similar, so...
This happened to me, and I tried to put this problem as far as I could but I finally had to deal with it. So, what are the problems?
Basically - if user will install the update, launch the app and it detects that Core Data model has changed - it will not be able to load it, and one of possible safe measures would be simply to delete existing Core Data model/data, create new and continue from that point with a fresh page. But - then you loose your old data, which could be cumbersome for users. (If you can simply download data from internet again - whew, no problem then!)
So, what do you need to do, in order to add support for data Core Data migration from previous version to new one?
It all depends on the changes. In my case, we introduced new feature - new module in app. Thus we needed to add new entity in Core Data model. So - old data will not be touched.
It turns out - for iOS 9 you simply need to add options when setting up NSPersistentStoreCoordinator persistent store.
_persistentStoreCoordinator = [[NSPersistentStoreCoordinator alloc] initWithManagedObjectModel:[self managedObjectModel]];

    NSDictionary *options = @{
  NSMigratePersistentStoresAutomaticallyOption:@(YES),
  NSInferMappingModelAutomaticallyOption:@(YES)};


    if (![_persistentStoreCoordinator addPersistentStoreWithType:NSSQLiteStoreType configuration:nil URL:storeURLFromCaches options:options error:&error])
    {
        NSLog(@"Unresolved error on adding Persistent Store With Type %@, %@, %@", error, [error userInfo], [error localizedFailureReason]);

        error = nil;

        [[NSFileManager defaultManager] removeItemAtURL:storeURLFromCaches error:&error];

        if (error == nil)
        {
            _persistentStoreCoordinator = nil;

            return [self persistentStoreCoordinator];
        }

    }
If you provide such options - when opening app with old existing Core Data model, it will now automatically try to map it to the new model). If you did not really complicate things (removed previously existing entities, or changed them heavily), then there should not be any problems!
Of course, it is preferred that after all this, you download AppStore version, set it up, fill some data, and then compile over it your new version, and see if all goes smoothly.
------------------------
Ok, but it turns out for iOS 8 this was only part of solution. iOS 8 could not automatically adjust previous model and it always ended up with error and so app had to remove previous database file, and start from scratch.
So, it turns out - you need to help out iOS - by adding versions in Core Data models.

In your xcode project select dbModel.xcdatamodeld and in the top status bar menu - choose "Add Model Version...".

And add a new name, so you can easily know which model version is which. I tend to add version next to the name. Select model version you are continuing from. (Should always be the oldest version).

At this point you have a new model version! This version should be activated - that can be done on the right side of xcode: (Model Version - Current:)
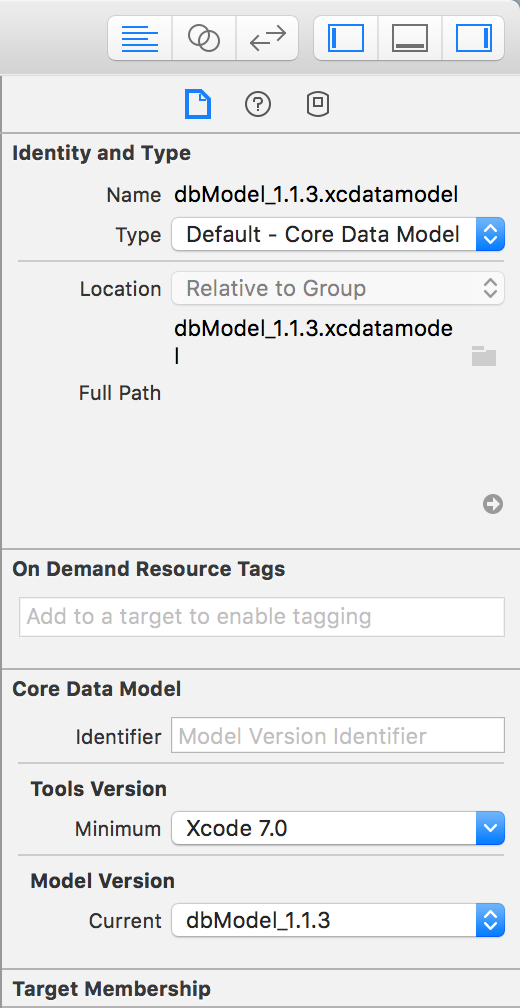
Your original model version should be in a state as it was for the first version, and all the changes should be done only for the new version, otherwise it will not work! Unfortunately I did not know this, and I ended up overwriting original version and only then realise the problem. I could not revert back the changes done to the model (xcode project was closed and opened), And no matter how much I tried to adjust old model - it still had some differences from the original model. So there was only one possibility how to get the original model - from the App Store .ipa file. Here is more info how to do it: (http://stackoverflow.com/a/28054459/894671) So now that you have original model, and new model - iOS (at least iOS 8 and iOS 9) will successfully migrate previously existing model to the new one.
------------------------
A whole different story is in case you need to adjust existing Core Data database data because of the new model. In that case you need to write up some functionality that will detect application version and will go through all necessary data and .. do the thing you need to do to adjust it (But only one time). (For example, add a new relationship, or add a new attribute with calculated value...)
This is up to you to find/figure out the best/easiest way to deal with it. In my case - on one of the versions I had to do something similar, so...
NSString *currentAppVersion = [NSString stringWithFormat:@"v %@ (%@)",
  [[NSBundle mainBundle] objectForInfoDictionaryKey:@"CFBundleShortVersionString"],
  [[NSBundle mainBundle] objectForInfoDictionaryKey:@"CFBundleVersion"]];


 if([[NSUserDefaults standardUserDefaults] objectForKey:@"AppVersion"]
  && ![[[NSUserDefaults standardUserDefaults] objectForKey:@"AppVersion"] isEqualToString:currentAppVersion])
 {
  LogRed(@"New app version encountered! Reset country code retrieval lat/lon!");

  [AppDelegate.askApi appAdjustmentsBecauseAppVersionChanged];
 }

 // This is for iOS Settings and application settings.
    [[NSUserDefaults standardUserDefaults] setObject:currentAppVersion forKey:@"AppVersion"];

    [[NSUserDefaults standardUserDefaults] synchronize];
Every time app is launched I detect app version and store it in NSUserDefaults again. So in this case I can detect that app was just opened and version has been changed. So I can call a function to adjust data because of that. (Probably there is a better way to do it, and probably I will change it once I will have to adjust more and more data, but for now.. this is how I deal with it).
Monday, January 25, 2016
Follow up on 22k objects | iOS
Just recently had to work again on the project which was dealing with ~22k objects.
On iOS there is a problem with main thread deadlock, in case you need to merge large amount of objects from background managed object context to main managed object context, while fetchedResultsController is listening to the changes.
In such case I found a simple workaround. Detect merged items count and in case it is too large, simply notify fetchedResultsController to remove its delegate, until merge is done. Then simply reload tableView.
On iOS there is a problem with main thread deadlock, in case you need to merge large amount of objects from background managed object context to main managed object context, while fetchedResultsController is listening to the changes.
In such case I found a simple workaround. Detect merged items count and in case it is too large, simply notify fetchedResultsController to remove its delegate, until merge is done. Then simply reload tableView.
- (void)backgroundContextDidSave:(NSNotification *)notification
{
    if (![NSThread isMainThread])
    {
        [self performSelectorOnMainThread:@selector(backgroundContextDidSave:)
            withObject:notification waitUntilDone:NO];

        return;
 }


 int countOfUpdatedInsertedObj = MAX([[[notification userInfo] objectForKey:NSUpdatedObjectsKey] count],
        [[[notification userInfo] objectForKey:NSInsertedObjectsKey] count]);


    if(countOfUpdatedInsertedObj > 500) //In case we have big crap-load to save - this will disable fetchcontroller delegate.
    {
        [[NSNotificationCenter defaultCenter] postNotificationName:BackgroundContextWillStartMergingIntoMainContextNotification object:nil];
    }


    NSManagedObjectContext *managedObjectContext = [notification object];

    if (([managedObjectContext persistentStoreCoordinator] == AppDelegate.db.persistentStoreCoordinator) &&
        (managedObjectContext != AppDelegate.db.managedObjectContext))
    {
        for(NSManagedObject *object in [[notification userInfo] objectForKey:NSUpdatedObjectsKey])
        {
            [[AppDelegate.db.managedObjectContext objectWithID:object.objectID] willAccessValueForKey:nil];
        }

        for(NSManagedObject *object in [[notification userInfo] objectForKey:NSInsertedObjectsKey])
        {
            [[AppDelegate.db.managedObjectContext objectWithID:object.objectID] willAccessValueForKey:nil];
        }


        [AppDelegate.db.managedObjectContext mergeChangesFromContextDidSaveNotification:notification];
    }


    if(countOfUpdatedInsertedObj > 500) //This means we previously warned any active fetchedResultsController to remove its delegate. So we set it up again.
    {
        [[NSNotificationCenter defaultCenter] postNotificationName:BackgroundContextWasMergedIntoMainContextNotification object:nil];
    }
}
BackgroundContextWillStartMergingIntoMainContextNotification and BackgroundContextWasMergedIntoMainContextNotification were created just for this purpose.
Saturday, March 28, 2015
Unsupported URL iOS
So I had a task to download some locations from google maps api. Task is simple - generate url string:
https://maps.googleapis.com/maps/api/place/radarsearch/json?location=27.5235,31.21111&radius=30000&types=dentist|hospital|pharmacy&key=FAKEKEY69_41gOViVF_v06xplaHcMl_py2jPIand download any possible locations from it. It works if you put it in web browser. But if I try to download data from iOS Application - it returns error:
Error description=Error Domain=NSURLErrorDomain Code=-1002 "unsupported URL" UserInfo=0x78f97920 {NSUnderlyingError=0x79f78bd0 "unsupported URL", NSLocalizedDescription=unsupported URL}
It turns out - the reason is url after all. It contains some illegal characters and it needs to be adjusted, before attempting to download data.NSString *path = @"https://maps.googleapis.com/maps/api/place/radarsearch/json?location=27.5235,31.21111&radius=30000&types=dentist|hospital|pharmacy&key=FAKEKEY69_41gOViVF_v06xplaHcMl_py2jPI";And final url string looks like this:
NSString *finalPath = [path stringByAddingPercentEncodingWithAllowedCharacters:[NSCharacterSet URLQueryAllowedCharacterSet]];
https://maps.googleapis.com/maps/api/place/radarsearch/json?location=27.5235,31.21111&radius=30000&types=dentist%7Chospital%7Cpharmacy&key=FAKEKEY69_41gOViVF_v06xplaHcMl_py2jPI
Thursday, April 3, 2014
Twitter and Facebook user ID
Since iOS 6 there is both Facebook and Twitter support in iOS Social framework. But by default - You can get only limited information about Your Facebook and Twitter account. In one of projects, I had to have user ID from Facebook and twitter.
In order to get this user ID from Facebook, You need to import FacebookSDK in Your project and:
For twitter it is simpler:
In order to get this user ID from Facebook, You need to import FacebookSDK in Your project and:
ACAccountStore *accountStore = [[ACAccountStore alloc] init];

ACAccountType *FBaccountType= [accountStore accountTypeWithAccountTypeIdentifier:ACAccountTypeIdentifierFacebook];

NSDictionary *options = @{
    ACFacebookAppIdKey: @"13569412415218",
    ACFacebookPermissionsKey: @[@"user_birthday"],
    ACFacebookAudienceKey: ACFacebookAudienceFriends
};

[accountStore requestAccessToAccountsWithType:FBaccountType options:options completion: ^(BOOL granted, NSError *e)
{
    if (granted)
    {
        NSLog(@"access granted");
    }
    else
    {
        NSLog(@"error getting permission %@",e);
    }
}];

ACAccountStore *account = [[ACAccountStore alloc] init];

ACAccountType *facebookAccountType = [account accountTypeWithAccountTypeIdentifier:ACAccountTypeIdentifierFacebook];

NSArray *accounts = [account accountsWithAccountType:facebookAccountType];

if(accounts && [accounts count])
{
    ACAccount *account = [accounts objectAtIndex:0];

    [FBSession openActiveSessionWithReadPermissions:nil allowLoginUI:YES completionHandler:^(FBSession *session,
        FBSessionState status, NSError *error)
    {
        [FBRequestConnection startForMeWithCompletionHandler:^(FBRequestConnection *connection, id result,
        NSError *error2)
        {
            NSLog(@"user id %@", [result objectForKey:@"id"]);
        }];
    }];
}
For twitter it is simpler:
ACAccountStore *account = [[ACAccountStore alloc] init];

ACAccountType *accountType = [account accountTypeWithAccountTypeIdentifier:ACAccountTypeIdentifierTwitter];

[account requestAccessToAccountsWithType:accountType withCompletionHandler:^(BOOL granted, NSError *error)
{
    NSArray *arrayOfAccounts = [account accountsWithAccountType:accountType];

    if(arrayOfAccounts && [arrayOfAccounts count])
    {
        ACAccount *account = [arrayOfAccounts objectAtIndex:0];

        NSDictionary *properties = [account dictionaryWithValuesForKeys:[NSArray arrayWithObject:@"properties"]];

        NSDictionary *details = [properties objectForKey:@"properties"];

        NSLog(@"user id %@", [details objectForKey:@"user_id"]);
    }
}];
OSX on SSD/HDD
So.. I've been using a Macbook pro for a (long) while - 2010 year model. It is becoming slower and slower over time, and also - when updating to newer OSX. Without retiring it - only option would be to get an SSD hard drive, to make it at least a tiny bit faster.
I decided to get a small SSD hard drive, and use it in dvd drive place using a caddy, so that I would still be able to use my old hard drive for some necessary-to-have-but-not-top-priority data.
Main problem is that I don't really have time to install fresh OSX on SSD and reconfigure everything again. Simplest way would be simply make a backup from old one, and then restore from backup onto new SSD - but in my case, I have too much necessary data on old drive, and the new SSD is only 120 GB large. That means - I should install a fresh install on new SSD, and then switch user home directory to old hard drive and set up all settings, configurations as I had on old OSX system.
So I set up a plan, how I would make the switch to new SSD+HDD system:
0.) Get Caddy from ebay - to replace DVD-drive;
1.) Get another SATA HDD which I would place inside Caddy so that I would have two HDD and I would know for sure, that such a system works;
2.) Get SSD (120 GB);
3.) Place SATA HDD (80 GB) in Caddy;
4.) Tidy up old HDD - so that, before final backup - it would have below 160 GB used space;
5.) Prepare bootable Mavericks flash drive;
6.) Do final backup from existing system;
7.) Get another SATA HDD (160 GB);
8.) Switch existing old HDD (320 GB) with 160 GB;
9.) Restore from backup latest backup. So - at this point I would have two identical HDD drives. If I mess up something, I can simply put back one of old HDD, and I can start working - if necessary;
10.) Test that everything works on 160 GB hard drive;
11.) Put in SSD and install Mavericks;
12.) Put old 320 GB hard drive in Caddy place, format and prepare so that user directories would link to old HDD. (and only main applications and OSX on new SSD);
13.) Copy necessary applications on SSD;
14.) Copy back necessary data from backup (because old HDD should be formatted - fresh);
15.) Create first backup from new system setup.
I know I am reallly making things complicated :D But I wanted to be sure, that in case something goes wrong - in few minutes I can get running on some backup HDD and continue work.

Everything will be as it was on previous OSX version - settings, backgrounds, folder structure in finder, files on desktop, shortcut links to application on menu, etc.. Everything will be the same. The interesting thing is - If You copy some applications from old HDD Applications folder to new SSD Applications folder - every shortcut will still continue working. But it will launch application from local SSD. If there is not such application on local SSD, it will then launch it from second HDD :) Everything just works! :)
Conclusion.
I decided to get a small SSD hard drive, and use it in dvd drive place using a caddy, so that I would still be able to use my old hard drive for some necessary-to-have-but-not-top-priority data.
Main problem is that I don't really have time to install fresh OSX on SSD and reconfigure everything again. Simplest way would be simply make a backup from old one, and then restore from backup onto new SSD - but in my case, I have too much necessary data on old drive, and the new SSD is only 120 GB large. That means - I should install a fresh install on new SSD, and then switch user home directory to old hard drive and set up all settings, configurations as I had on old OSX system.
So I set up a plan, how I would make the switch to new SSD+HDD system:
0.) Get Caddy from ebay - to replace DVD-drive;
1.) Get another SATA HDD which I would place inside Caddy so that I would have two HDD and I would know for sure, that such a system works;
2.) Get SSD (120 GB);
3.) Place SATA HDD (80 GB) in Caddy;
4.) Tidy up old HDD - so that, before final backup - it would have below 160 GB used space;
5.) Prepare bootable Mavericks flash drive;
6.) Do final backup from existing system;
7.) Get another SATA HDD (160 GB);
8.) Switch existing old HDD (320 GB) with 160 GB;
9.) Restore from backup latest backup. So - at this point I would have two identical HDD drives. If I mess up something, I can simply put back one of old HDD, and I can start working - if necessary;
10.) Test that everything works on 160 GB hard drive;
11.) Put in SSD and install Mavericks;
12.) Put old 320 GB hard drive in Caddy place, format and prepare so that user directories would link to old HDD. (and only main applications and OSX on new SSD);
13.) Copy necessary applications on SSD;
14.) Copy back necessary data from backup (because old HDD should be formatted - fresh);
15.) Create first backup from new system setup.
I know I am reallly making things complicated :D But I wanted to be sure, that in case something goes wrong - in few minutes I can get running on some backup HDD and continue work.
I got to the 5th step, and... didn't had time to continue..
Month went by, and I encountered a problem with my temporary setup - 80 GB HDD, which was located in Caddy stopped working. What is the problem? 80 GB HDD died, or Caddy is faulty? And if HDD died - why did it? I decided that then it is too risky to put current 320 GB HDD in Caddy ( so that SSD could be placed in original HDD place) - because, maybe Caddy is the reason HDD died.
So I decided to leave 320 GB HDD intact, put in SSD in Caddy, install fresh Mavericks, and simply change SSD OSX user home directory to old HDD user directory. It is simply doable using Settings->Users&Groups->Click_On_Lock->Second_mouse_key_on_your_user->Advanced options
and You will see a screen like this:
Simply change Home directory to one on old HDD, restart and.... once it loads OSX again, You will not believe Your eyes :) (At least I didn't at the beginning, and did like 5 restarts, before starting to believe)
Everything will be as it was on previous OSX version - settings, backgrounds, folder structure in finder, files on desktop, shortcut links to application on menu, etc.. Everything will be the same. The interesting thing is - If You copy some applications from old HDD Applications folder to new SSD Applications folder - every shortcut will still continue working. But it will launch application from local SSD. If there is not such application on local SSD, it will then launch it from second HDD :) Everything just works! :)
P.S. One thing I did notice - I had previously Hard drive names with spaces. Once I started working with xcode on SSD, which linked to projects from old HDD, it did show problems, that it cannot find some files, or something like that. Turns out - it did not like spaces in middle of names. So - what You have to do IS - just second click on hard drive and rename with no spaces. !!!BUT!!!! - then You must open Settings->Users&Groups->..... and change the link to Home directory again, or else - after restart You will not be able to log in. (I had this problem. To fix it - I had to boot from old HDD, rename HDD to previous name, boot again from SSD, rename again to name without spaces AND change home directory to correct one. Then restart. And it worked.).
Conclusion.
This kind of system setup is really handy. For example - if something will happen with new SSD, I will still be able to boot up from old HDD and have the exact same settings and up to date projects. If something happens to old HDD... well... that might be a problem, but for that I try to make often backups.
Saturday, February 22, 2014
22k objects
Let's imagine, that there is a device (iPhone) and web server. On server there are 22 000 objects (each object with name, date, count, title) and we would need to download all 22 000 objects (2 MB). The faster the better. What are our options?
- Download in batches (using revision, each time download dictionary with ~500 objects);
- Download dictionary with all objects;
- Download archived JSON string (containing all objects);
- Download archived binary data from JSON string (containing all objects);
Downloading in batches is the most slower case - because, there is a delay between downloads, but on the other hand - for user (in application), there appears new data in list every few seconds. Still - with 500 object batches, it would take 44 download times. And - if user needs the whole 22 000 objects - he must wait while all data has been downloaded.
Downloading dictionary with all objects at once will be faster in general (no delay between downloads), but the downside is that it will take much more time until user will finally see some data.
Then there is the possibility to archive data on server side - so that it would take less time to actually download those 22 000 objects - and this post is actually about the results on option 3 and 4.
I exported from phpMyAdmin SQL database all 22 000 objects as .json file - ~2 MB. Then I archived it - ~450 KB. Great! But this can be optimised even more. In SQL database I renamed all column names:
- aName => n
- aDate => d
- aCount => c
- aInfo => i
And then exported again .json file: ~ 1.4 MB, and once .json file was archived: ~ 290 KB.
Then I uploaded this archive file to server and started experiment:
- downloaded in Application; (1.304701 seconds)
- saved archive file in Cache directory; (0.016478 seconds)
- unarchived and saved file; (0.078202 seconds)
- loaded from file to a text string; (0.064022 seconds)
- converted to NSData (binary); (0.027673 seconds)
- converted to JSON; (0.377311 seconds)
- iterated through all items and write in DB
(without checking if such object exist); (1.209763 seconds)
TOTAL TIME till user sees results: 3.07815 seconds
Pretty good results, but in one of my previous projects, where I had to work with .wavefront object files, I ended up converting .wavefront objects to binary files, which could be loaded into necessary arrays once object should be loaded. So - maybe I could do the same here - convert to binary, download binary and fill in JSON array from binary data.
First problem - when converting 1.4 MB .json file to binary - it boosts up its size to 4.9 MB. Once archived - 2 MB.
So - second experiment (with binary file):
- downloaded in Application; (9.994034 seconds)
- saved archive file in Cache directory; (0.070027 seconds)
- unarchived and saved file; (0.255974 seconds)
- loaded from file to a JSON array; (1.064016 seconds)
- iterated through all items and write in DB
(without checking if such object exist); (1.224640 seconds)
TOTAL TIME till user sees results: 12.608691 seconds
Working with .wavefront 3d objects binary data usage paid itself off, because:
- .wavefront file contains only float values - thus, converting to binary did not increase file size;
- in order to show object, I had to load into array necessary vertices, normals, texture coordinates - it is much faster to fill in array from binary data, than iterating through arrays and copying each value between two arrays.
(Experiments were conducted on iPhone 5 / connected to WIFI)
Friday, February 21, 2014
iOS Jigsaw puzzle demo
A while ago someone on StackOverflow asked a question about creating a jigsaw puzzle game. He was not really sure what would be the best way to create puzzle pieces from a camera roll image.
At the beginning I suggested him to create a mask image for each piece and if pieces would be the same size and same count all the time, it would be enough. But I know that's not really a good way, so I decided to make a quick jigsaw puzzle demo, just to prove to myself that I can do it + gain extra experience.

So let's cut to the chase: I uploaded my experiment here: JigsawDemo and it has following features:
But this is just a demo, so:
Puzzle piece creating explained in steps:
At the beginning I suggested him to create a mask image for each piece and if pieces would be the same size and same count all the time, it would be enough. But I know that's not really a good way, so I decided to make a quick jigsaw puzzle demo, just to prove to myself that I can do it + gain extra experience.
So let's cut to the chase: I uploaded my experiment here: JigsawDemo and it has following features:
- Provide column/row count and it will generate necessary puzzle pieces with correct width/height;
- The more columns/rows - the smaller the width/height and outer/inner puzzle shape form;
- Each time randomly generated piece sides;
- Can randomly position / rotate pieces at the beginning of launch;
- Each piece can be rotated by tap, or by two fingers (like real puzzle pieces) - but once released, it will snap to 90/180/270/360 degrees;
- Each piece can be moved if touched on its “touchable shape” boundary (which is mostly the same visible puzzle shape, but WITHOUT inner shapes);
But this is just a demo, so:
- No checking if piece is in its right place;
- If more than 100 pieces - it starts to lag, because, when picking up a piece, it goes through all subviews until it finds correct piece. (For the sake of the demo, I left it that way..).
Puzzle piece creating explained in steps:
- Provide puzzle image;
- Provide puzzle column and row count;
- Based on image size/width - we calculate each piece's width and height;
- Based on calculated width and height, we calculate piece's side shape deepness (in demo it is simply quarter of width/height - then it looks good in all sizes);

- Calculate puzzle piece side types randomly, keeping in mind these rules:
- puzzle sides on the outside will always be straight;
- puzzle sides on the inside will never be straight - either outer shape or inner shape;
- left side of the next puzzle piece will have opposite shape. (If first piece right side was outer shape, then next piece left side will be inner shape).
- For each piece we calculate frames for image cropping, so that each cropped image would fill its puzzle piece;

- Then we create bézier paths for visual image clipping (so that it really would look like a real jigsaw puzzle piece) and bézier paths for touch recognition. We can use the same bézier path, but as I tested this demo, I noticed, that it is pretty hard to pinch rotate a piece, if a piece is small and have at least two inner side shapes - thus, I decided to create another bézier path shape for easier touch recognition - for each visual image clipping path, every inner side shape will be saved as straight side;

- Then we create UIImageView for each puzzle piece. We crop it, position it, add touch recognition shape, add border line shape. We also add rotation and panning gesture recognisers;

That's it - puzzle pieces are ready to be visible and interacted with!
Friday, January 10, 2014
iOS OpenGL Wavefront objects
So a while ago I had a task to make a simple iOS App, which would contain a list of 3D objects and fullscreen OpenGL view, where user could pinch zoom, rotate and pan around corresponding object.
As I've never had any real experience in OpenGL, I figured - best solution would be search for some working examples, which would be easily adaptable for my needs.
I found this article: (code here) and I decided to use this code as a base. It's ES 1, but hey - it's a working demo. Kinda. Well - it works great using tiny wavefront objects. But for objects that are larger than 500kb in size - I start to notice, that it takes a while on device (and even on simulator) before wavefront object file has been parsed and object appears. In some cases, when object file was 5-10 mb in size - it would take few minutes to parse wavefront object file and in most cases - it would crash (either memory run out, or this example code is not optimised enough to parse such big objects (could be some memory leaks?)).
So what can I do about it? I decided to use Blender Decimate feature (only a bit, so that object would still look more or less like original): to decrease object size and also - implemented encoding / decoding feature, so that Device would only parse wavefront object file only once and then load from memory already parsed data using these functions:
I found this article: (code here) and I decided to use this code as a base. It's ES 1, but hey - it's a working demo. Kinda. Well - it works great using tiny wavefront objects. But for objects that are larger than 500kb in size - I start to notice, that it takes a while on device (and even on simulator) before wavefront object file has been parsed and object appears. In some cases, when object file was 5-10 mb in size - it would take few minutes to parse wavefront object file and in most cases - it would crash (either memory run out, or this example code is not optimised enough to parse such big objects (could be some memory leaks?)).
So what can I do about it? I decided to use Blender Decimate feature (only a bit, so that object would still look more or less like original): to decrease object size and also - implemented encoding / decoding feature, so that Device would only parse wavefront object file only once and then load from memory already parsed data using these functions:
- (void)encodeWithCoder:(NSCoder *)encoder

- (id)initWithCoder:(NSCoder *)decoder
Object parsing was then done in background thread - but because of that, it took a bit longer than on main thread, but at least Application can be used while that happens (for example, read accompanying article, while objects are prepared). So - imagine - first time opening application, all objects are downloaded from server, and then each object is parsed within few seconds to 5 minutes (according to it's size). I could leave it like that because - it is more or less working as intended. Just a bit delay until objects will be accessible to user, but I decide to search for some other solutions.
Then I found this one: VRToolKit. (More info here) This example also uses wavefront objects, BUT!! - parsing is done on computer using a perl script, and then in Application You have already prepared parsed data arrays, which can be directly loaded in OpenGL. Sounds perfect! And it is! :
- no more parsing on device,
- objects would be directly loaded in memory (almost seamless delay before seeing object (even for really 'big' objects). (Tested with 27 mb large .obj file (147 mb, after conversion)).
Unfortunately there were few problems.
VRToolKit solution would only work in case You have static objects in Application. So - I need object array files to be included in bundle, in order to load them in OpenGL. Other downside is 5x larger converted file from .obj file.
VRToolKit solution would only work in case You have static objects in Application. So - I need object array files to be included in bundle, in order to load them in OpenGL. Other downside is 5x larger converted file from .obj file.
For file size problem I found a solution: mtl2opengl - more optimised perl script, which could reduce size from 147mb to 49 mb. (Removed unnecessary comments, float numbers reduced to 3 digits after a comma).
But I noticed a way to reduce size even more - I removed unnecessary spaces between floats, and also removed new-lines and I got from 49mb to 41mb. But this could be reduced even more - put this file in archive and we go from 41mb to 2mb. (Then on Application side - simply unarchive).
Ok, but what about main problem - we need dynamically downloadable objects not static ones!?
Ok, but what about main problem - we need dynamically downloadable objects not static ones!?
The solution was simple - combine VRToolKit solution with decoding. When previously experimenting with Encoding / Decoding, I could convert arrays and variables to binary data, and then later decode them back so that I can fill in necessary arrays and variables with that data (thus - skipping wavefront object file from parsing again). But what if I could prepare encoded data on computer (when wavefront object files are parsed), store binary data in files, which would later be downloaded in Application? It turns out it is that simple. By modifying more mtl2opengl perl script, I was now able to provide a wavefront object file to the script, and it would generate 4 files:
- header,
- normals,
- textureCoords,
- vertices.
Normals, TextureCoords, Vertices obviously contains binary data, which we use to fill in necessary OpenGL arrays, but header file contains number of faces and object center coordinates. Faces count is used to allocate OpenGL array, before filling with binary data.
In the end - objects would still appear almost immediately and it is possible to load 'big' objects - problem solved!
Ofcourse - objects cannot be infinite big. We have limited memory and computing power on device, so - the bigger the object, the bigger possibility of laggs. But using this solution, we don't have to put up with only tiny objects.
Why is the perl script generating 3 separate binary files instead of one, You might ask? At the beginning it generated one big file. But I noticed, that if file is too large, and it is archived, then downloaded in Application - all possible unarchiving solutions appear to incorrectly unarchive this file, in case it is really big and there is too little memory available. So - by splitting this big file in 3 parts, we rise the size limit bar.
Because I used OpenGL example to start with, and VRToolKit solution to parse objects on computer, I feel obliged to give back to community, so I scraped together a demo project: DWO.
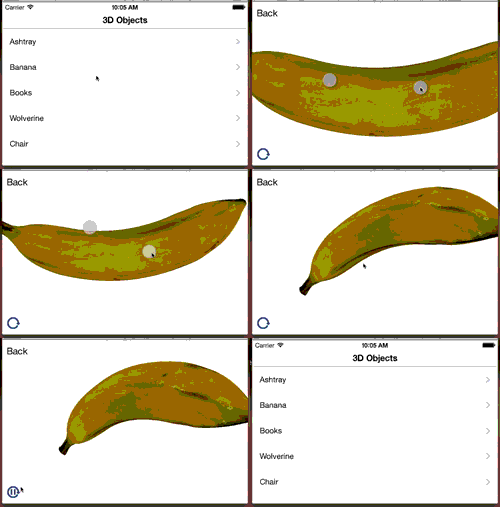
It contains about 8 example wavefront objects (with header file and binary normals, textureCoords, vertices files), OpenGL fullscreen view with pinch zoom / panning / rotating / auto rotate capabilities. Also, I included my modified version of mtl2opengl perl script. (Takes in wavefront object file, generates folder with mentioned 4 files).
It contains about 8 example wavefront objects (with header file and binary normals, textureCoords, vertices files), OpenGL fullscreen view with pinch zoom / panning / rotating / auto rotate capabilities. Also, I included my modified version of mtl2opengl perl script. (Takes in wavefront object file, generates folder with mentioned 4 files).
In order to implement any new wavefront object in this demo application, It probably needs to be scaled down in blender (at least all of wavefront object files that I included - needed a scale down to 0.01 or more). It is possible (or it was in the original mtl2opengl script), that it would scale down automatically, before exporting, but for my project, I decided to do it manually (so that I could scale down manually to have perfect size for my needs). Feel free to implement this feature in script if You need it!
Unlike original and all other OpenGL example xcode projects, In my example I don't use mtl files at all. Instead I simply load a texture image, by corresponding prefix name. At the time I am writing this, I think that it sucks that I did not use mtl files, because now I am limited to only one texture file. But… it is enough for my project.
Anyways - I hope You can gain at least something from this solution or from modified perl script or from provided demo Application.
Tuesday, November 12, 2013
First post
I guess I have to finally create my first post. So let's start with something easy and handy (at least for me :)) .
So these are instructions for setting up a cron job on your localhost using MAMP on a Mac.
I recommend that you first try setting the job to run every 1 minute (with */1), so that you can check, reasonably quickly, that it is running. Then edit crontab again and change the curl command to your preferred time.
P.S. This is basically copied from this source, but I might need this info later again, so - easier for me to find it..
So these are instructions for setting up a cron job on your localhost using MAMP on a Mac.
- In Terminal type crontab -e. This allows you to add a cron job, using the vim editor.
- Press i on your keyboard to go into vim's insert mode.
- Type in you cron command. For example, to run at minute 5 of every hour using curl, use:
5 * * * * /usr/bin/curl --silent --compressed http://localhost:8888/cron.php
But to run every 5 minutes, use:*/5 * * * * /usr/bin/curl --silent --compressed http://localhost:8888/cron.php
Note that if you are not using MAMP's default 8888 port, you should leave that off. - Press escape key to exit vim's insert mode.
- Type ZZ (Must be capital letters -- saves the file and exits crontab).
- Verify the cron job details by typing crontab -l (that's a lower case L) at the terminal prompt.
I recommend that you first try setting the job to run every 1 minute (with */1), so that you can check, reasonably quickly, that it is running. Then edit crontab again and change the curl command to your preferred time.
P.S. This is basically copied from this source, but I might need this info later again, so - easier for me to find it..
Subscribe to:
Posts (Atom)