Saturday, February 27, 2016

Xcode coloured logs | Swift

For Obj-C I used to love this one: https://github.com/robbiehanson/XcodeColors It gave me superman-like capabilities, and I could have various type of console log outputs, which I could turn on/off, and with any colour I desired. Fantastic!


But then I started playing around with Swift. But the same library is not done in the same quality for Swift. Yes - I get coloured logs, but one of XcodeColors features I loved was that it also logged out pretty timestamp and function from which it was called.  I could simply write

DLog();

And it would output in console something like:


And it was great! but for swift it produces:


So, I was not in search of something similar to Obj-C alternative.

Of course if you simply replace print with NSLog, then it at once becomes more usable:


But still, no function origin.

So I searched the web, StackOverflow until I could gather together a simple class, which gives me just those capabilities: https://github.com/GuntisTreulands/ColorLogger-Swift


So now I can get pretty timestamp, original function name, and coloured output. And usage is as similar to Obj-C alternative as possible!


Log()

Log(window)
LogRed("Blue test")
LogBlue("Red fountain")
LogOrange("Yellow submarine")
LogBlue("text count \(5) and object \(window)")

LogOrange(("text", "bext", 5, temp))


Replace alpha in image with white colour | Mac

Bunch of images with alpha colour. Task is to post those images (one at a time, every few days) to Facebook, Twitter.  Problem is - once uploaded - alpha is removed and it shows black background instead.

Ugly!

So, I found this cool little app, that removes Alpha channel from images. (Drag and drop) But it then again is black. I tweaked code a little bit and uploaded it to GitHub - maybe it will be handy to someone also. It sure was helpful for me... (100 images in few seconds, and I can move on with my life on some more interesting tasks :) )


Lightweight Core Data Migration | Obj-C

So.. you have an app, that uses Core Data database, and data that is being accumulated in app is offline only. Everything is great but now you need to develop next version, but it requires to adjust database structure (new entities or maybe add new attributes?).

This happened to me, and I tried to put this problem as far as I could but I finally had to deal with it. So, what are the problems?

Basically - if user will install the update, launch the app and it detects that Core Data model has changed - it will not be able to load it, and one of possible safe measures would be simply to delete existing Core Data model/data, create new and continue from that point with a fresh page. But - then you loose your old data, which could be cumbersome for users. (If you can simply download data from internet again - whew, no problem then!)

So, what do you need to do, in order to add support for data Core Data migration from previous version to new one?

It all depends on the changes. In my case, we introduced new feature - new module in app. Thus we needed to add new entity in Core Data model. So - old data will not be touched.

It turns out - for iOS 9 you simply need to add options when setting up NSPersistentStoreCoordinator persistent store.

_persistentStoreCoordinator = [[NSPersistentStoreCoordinator alloc] initWithManagedObjectModel:[self managedObjectModel]];
 
    NSDictionary *options = @{
  NSMigratePersistentStoresAutomaticallyOption:@(YES),
  NSInferMappingModelAutomaticallyOption:@(YES)};
 
 
    if (![_persistentStoreCoordinator addPersistentStoreWithType:NSSQLiteStoreType configuration:nil URL:storeURLFromCaches options:options error:&error])
    {
        NSLog(@"Unresolved error on adding Persistent Store With Type %@, %@, %@", error, [error userInfo], [error localizedFailureReason]);
  
        error = nil;
        
        [[NSFileManager defaultManager] removeItemAtURL:storeURLFromCaches error:&error];
        
        if (error == nil)
        {
            _persistentStoreCoordinator = nil;
            
            return [self persistentStoreCoordinator];
        }

    }

If you provide such options - when opening app with old existing Core Data model, it will now automatically try to map it to the new model). If you did not really complicate things (removed previously existing entities, or changed them heavily), then there should not be any problems!

Of course, it is preferred that after all this, you download AppStore version, set it up, fill some data, and then compile over it your new version, and see if all goes smoothly.

 ------------------------

Ok, but it turns out for iOS 8 this was only part of solution. iOS 8 could not automatically adjust previous model and it always ended up with error and so app had to remove previous database file, and start from scratch.

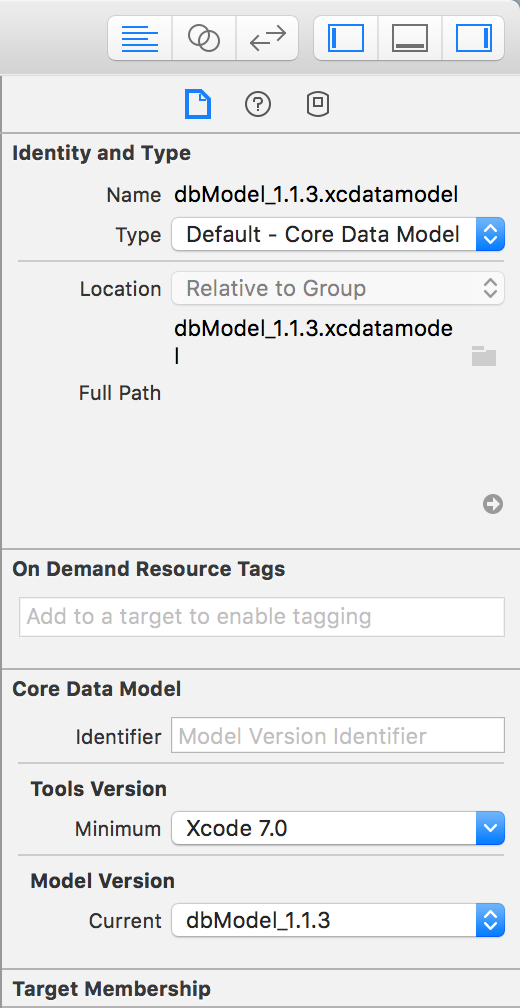
So, it turns out - you need to help out iOS - by adding versions in Core Data models.


In your xcode project select dbModel.xcdatamodeld and in the top status bar menu - choose "Add Model Version...".


And add a new name, so you can easily know which model version is which. I tend to add version next to the name. Select model version you are continuing from. (Should always be the oldest version).


At this point you have a new model version! This version should be activated - that can be done on the right side of xcode: (Model Version - Current:)


Your original model version should be in a state as it was for the first version, and all the changes should be done only for the new version, otherwise it will not work! Unfortunately I did not know this, and I ended up overwriting original version and only then realise the problem. I could not revert back the changes done to the model (xcode project was closed and opened), And no matter how much I tried to adjust old model - it still had some differences from the original model. So there was only one possibility how to get the original model - from the App Store .ipa file. Here is more info how to do it: (http://stackoverflow.com/a/28054459/894671) So now that you have original model, and new model - iOS (at least iOS 8 and iOS 9) will successfully migrate previously existing model to the new one.

------------------------

 A whole different story is in case you need to adjust existing Core Data database data because of the new model. In that case you need to write up some functionality that will detect application version and will go through all necessary data and .. do the thing you need to do to adjust it (But only one time). (For example, add a new relationship, or add a new attribute with calculated value...)

This is up to you to find/figure out the best/easiest way to deal with it. In my case - on one of the versions I had to do something similar, so...

NSString *currentAppVersion = [NSString stringWithFormat:@"v %@ (%@)",
  [[NSBundle mainBundle] objectForInfoDictionaryKey:@"CFBundleShortVersionString"],
  [[NSBundle mainBundle] objectForInfoDictionaryKey:@"CFBundleVersion"]];
 
 
 if([[NSUserDefaults standardUserDefaults] objectForKey:@"AppVersion"]
  && ![[[NSUserDefaults standardUserDefaults] objectForKey:@"AppVersion"] isEqualToString:currentAppVersion])
 {
  LogRed(@"New app version encountered! Reset country code retrieval lat/lon!");
  
  [AppDelegate.askApi appAdjustmentsBecauseAppVersionChanged];
 }
 
 // This is for iOS Settings and application settings.
    [[NSUserDefaults standardUserDefaults] setObject:currentAppVersion forKey:@"AppVersion"];
    
    [[NSUserDefaults standardUserDefaults] synchronize];

Every time app is launched I detect app version and store it in NSUserDefaults again. So in this case I can detect that app was just opened and version has been changed. So I can call a function to adjust data because of that. (Probably there is a better way to do it, and probably I will change it once I will have to adjust more and more data, but for now.. this is how I deal with it).

Monday, January 25, 2016

Follow up on 22k objects | iOS

Just recently had to work again on the project which was dealing with ~22k objects.

On iOS there is a problem with main thread deadlock, in case you need to merge large amount of objects from background managed object context to main managed object context, while fetchedResultsController is listening to the changes.

In such case I found a simple workaround. Detect merged items count and in case it is too large, simply notify fetchedResultsController to remove its delegate, until merge is done. Then simply reload tableView.
 
- (void)backgroundContextDidSave:(NSNotification *)notification
{
    if (![NSThread isMainThread])
    {
        [self performSelectorOnMainThread:@selector(backgroundContextDidSave:)
            withObject:notification waitUntilDone:NO];
        
        return;
 }
 
 
 int countOfUpdatedInsertedObj = MAX([[[notification userInfo] objectForKey:NSUpdatedObjectsKey] count],
        [[[notification userInfo] objectForKey:NSInsertedObjectsKey] count]);
    
    
    if(countOfUpdatedInsertedObj > 500) //In case we have big crap-load to save - this will disable fetchcontroller delegate.
    {
        [[NSNotificationCenter defaultCenter] postNotificationName:BackgroundContextWillStartMergingIntoMainContextNotification object:nil];
    }
 
 
    NSManagedObjectContext *managedObjectContext = [notification object];
    
    if (([managedObjectContext persistentStoreCoordinator] == AppDelegate.db.persistentStoreCoordinator) &&
        (managedObjectContext != AppDelegate.db.managedObjectContext))
    {
        for(NSManagedObject *object in [[notification userInfo] objectForKey:NSUpdatedObjectsKey])
        {
            [[AppDelegate.db.managedObjectContext objectWithID:object.objectID] willAccessValueForKey:nil];
        }

        for(NSManagedObject *object in [[notification userInfo] objectForKey:NSInsertedObjectsKey])
        {
            [[AppDelegate.db.managedObjectContext objectWithID:object.objectID] willAccessValueForKey:nil];
        }


        [AppDelegate.db.managedObjectContext mergeChangesFromContextDidSaveNotification:notification];
    }
 
    
    if(countOfUpdatedInsertedObj > 500) //This means we previously warned any active fetchedResultsController to remove its delegate. So we set it up again.
    {
        [[NSNotificationCenter defaultCenter] postNotificationName:BackgroundContextWasMergedIntoMainContextNotification object:nil];
    }
}

BackgroundContextWillStartMergingIntoMainContextNotification and BackgroundContextWasMergedIntoMainContextNotification were created just for this purpose.

Saturday, March 28, 2015

Unsupported URL iOS

So I had a task to download some locations from google maps api. Task is simple - generate url string:
https://maps.googleapis.com/maps/api/place/radarsearch/json?location=27.5235,31.21111&radius=30000&types=dentist|hospital|pharmacy&key=FAKEKEY69_41gOViVF_v06xplaHcMl_py2jPI
and download any possible locations from it. It works if you put it in web browser. But if I try to download data from iOS Application - it returns error:
Error description=Error Domain=NSURLErrorDomain Code=-1002 "unsupported URL" UserInfo=0x78f97920 {NSUnderlyingError=0x79f78bd0 "unsupported URL", NSLocalizedDescription=unsupported URL}
It turns out - the reason is url after all. It contains some illegal characters and it needs to be adjusted, before attempting to download data.
NSString *path = @"https://maps.googleapis.com/maps/api/place/radarsearch/json?location=27.5235,31.21111&radius=30000&types=dentist|hospital|pharmacy&key=FAKEKEY69_41gOViVF_v06xplaHcMl_py2jPI";
NSString *finalPath = [path stringByAddingPercentEncodingWithAllowedCharacters:[NSCharacterSet URLQueryAllowedCharacterSet]];
And final url string looks like this:
https://maps.googleapis.com/maps/api/place/radarsearch/json?location=27.5235,31.21111&radius=30000&types=dentist%7Chospital%7Cpharmacy&key=FAKEKEY69_41gOViVF_v06xplaHcMl_py2jPI


Thursday, April 3, 2014

Twitter and Facebook user ID

Since iOS 6 there is both Facebook and Twitter support in iOS Social framework. But by default - You can get only limited information about Your Facebook and Twitter account. In one of projects, I had to have user ID from Facebook and twitter.

In order to get this user ID from Facebook, You need to import FacebookSDK in Your project and:
ACAccountStore *accountStore = [[ACAccountStore alloc] init];

ACAccountType *FBaccountType= [accountStore accountTypeWithAccountTypeIdentifier:ACAccountTypeIdentifierFacebook];

NSDictionary *options = @{
    ACFacebookAppIdKey: @"13569412415218",
    ACFacebookPermissionsKey: @[@"user_birthday"],
    ACFacebookAudienceKey: ACFacebookAudienceFriends
};

[accountStore requestAccessToAccountsWithType:FBaccountType options:options completion: ^(BOOL granted, NSError *e)
{
    if (granted)
    {
        NSLog(@"access granted");
    }
    else
    {
        NSLog(@"error getting permission %@",e);
    }
}];

ACAccountStore *account = [[ACAccountStore alloc] init];

ACAccountType *facebookAccountType = [account accountTypeWithAccountTypeIdentifier:ACAccountTypeIdentifierFacebook];

NSArray *accounts = [account accountsWithAccountType:facebookAccountType];

if(accounts && [accounts count])
{
    ACAccount *account = [accounts objectAtIndex:0];
    
    [FBSession openActiveSessionWithReadPermissions:nil allowLoginUI:YES completionHandler:^(FBSession *session,
        FBSessionState status, NSError *error)
    {
        [FBRequestConnection startForMeWithCompletionHandler:^(FBRequestConnection *connection, id result,
        NSError *error2)
        {
            NSLog(@"user id %@", [result objectForKey:@"id"]);
        }];
    }];
}

For twitter it is simpler:

ACAccountStore *account = [[ACAccountStore alloc] init];

ACAccountType *accountType = [account accountTypeWithAccountTypeIdentifier:ACAccountTypeIdentifierTwitter];

[account requestAccessToAccountsWithType:accountType withCompletionHandler:^(BOOL granted, NSError *error)
{
    NSArray *arrayOfAccounts = [account accountsWithAccountType:accountType];

    if(arrayOfAccounts && [arrayOfAccounts count])
    {
        ACAccount *account = [arrayOfAccounts objectAtIndex:0];

        NSDictionary *properties = [account dictionaryWithValuesForKeys:[NSArray arrayWithObject:@"properties"]];

        NSDictionary *details = [properties objectForKey:@"properties"];
        
        NSLog(@"user id %@", [details objectForKey:@"user_id"]);
    }
}];

OSX on SSD/HDD

So.. I've been using a Macbook pro for a (long) while - 2010 year model. It is becoming slower and slower over time, and also - when updating to newer OSX. Without retiring it - only option would be to get an SSD hard drive, to make it at least a tiny bit faster.

I decided to get  a small SSD hard drive, and use it in dvd drive place using a caddy, so that I would still be able to use my old hard drive for some necessary-to-have-but-not-top-priority data.

Main problem is that I don't really have time to install fresh OSX on SSD and reconfigure everything again. Simplest way would be simply make a backup from old one, and then restore from backup onto new SSD - but in my case, I have too much necessary data on old drive, and the new SSD is only 120 GB large. That means - I should install a fresh install on new SSD, and then switch user home directory to old hard drive and set up all settings, configurations as I had on old OSX system.

So I set up a plan, how I would make the switch to new SSD+HDD system:

0.) Get Caddy from ebay - to replace DVD-drive;
1.) Get another SATA HDD which I would place inside Caddy so that I would have two HDD and I would know for sure, that such a system works;
2.) Get SSD (120 GB);
3.) Place SATA HDD (80 GB) in Caddy;
4.) Tidy up old HDD - so that, before final backup - it would have below 160 GB used space;
5.) Prepare bootable Mavericks flash drive;
6.) Do final backup from existing system;
7.) Get another SATA HDD (160 GB);
8.) Switch existing old HDD (320 GB) with 160 GB;
9.) Restore from backup latest backup. So - at this point I would have two identical HDD drives. If I mess up something, I can simply put back one of old HDD, and I can start working - if necessary;
10.) Test that everything works on 160 GB hard drive;
11.) Put in SSD and install Mavericks;
12.) Put old 320 GB hard drive in Caddy place, format and prepare so that user directories would link to old HDD. (and only main applications and OSX on new SSD);
13.) Copy necessary applications on SSD;
14.) Copy back necessary data from backup (because old HDD should be formatted - fresh);
15.) Create first backup from new system setup.

I know I am reallly making things complicated :D But I wanted to be sure, that in case something goes wrong - in few minutes I can get running on some backup HDD and continue work.

I got to the 5th step, and... didn't had time to continue.. 

Month went by, and I encountered a problem with my temporary setup - 80 GB HDD, which was located in Caddy stopped working. What is the problem? 80 GB HDD died, or Caddy is faulty? And if HDD died - why did it? I decided that then it is too risky to put current 320 GB HDD in Caddy ( so that SSD could be placed in original HDD place) - because, maybe Caddy is the reason HDD died.

So I decided to leave 320 GB HDD intact, put in SSD in Caddy, install fresh Mavericks, and simply change SSD OSX user home directory to old HDD user directory. It is simply doable using Settings->Users&Groups->Click_On_Lock->Second_mouse_key_on_your_user->Advanced options  

and You will see a screen like this:


Simply change Home directory to one on old HDD, restart and.... once it loads OSX again, You will not believe Your eyes :)  (At least I didn't at the beginning, and did like 5 restarts, before starting to believe)

Everything will be as it was on previous OSX version - settings, backgrounds, folder structure in finder, files on desktop, shortcut links to application on menu, etc.. Everything will be the same. The interesting thing is - If You copy some applications from old HDD Applications folder to new SSD Applications folder - every shortcut will still continue working. But it will launch application from local SSD. If there is not such application on local SSD, it will then launch it from second HDD :)  Everything just works! :)


P.S.  One thing I did notice - I had previously Hard drive names with spaces. Once I started working with xcode on SSD, which linked to projects from old HDD, it did show problems, that it cannot find some files, or something like that. Turns out - it did not like spaces in middle of names. So - what You have to do IS - just second click on hard drive and rename with no spaces. !!!BUT!!!! - then You must open Settings->Users&Groups->.....  and change the link to Home directory again, or else - after restart You will not be able to log in. (I had this problem. To fix it - I had to boot from old HDD, rename HDD to previous name, boot again from SSD, rename again to name without spaces AND change home directory to correct one. Then restart. And it worked.).


Conclusion.
This kind of system setup is really handy. For example  - if something will happen with new SSD, I will still be able to boot up from old HDD and have the exact same settings and up to date projects. If something happens to old HDD... well... that might be a problem, but for that I try to make often backups.